 About
AboutContainment Bay Z1T9 (Extreme)
expand_more
Zurvan
Phase 1 Alerts
- Tanks should be sure to keep Zurvan facing away from the raid as he has a heavy cleave.
- Players can fall off when Zurvan destroys each quadrant of the platform - mind the telegraphs to avoid this.
Platform Quadrants
- Zurvan will eventually knock off each quadrant of the platform. The order is: East, North, West, South - be sure not to fall off.
Attack Script
- Flare Star
expand_more
Flare Star
Flare Star
Everyone
AoE Puddle
Important Notes:
- This AoE will drop on random players - it's important to stack before the cast goes off in order to bait where the AoE will drop and maintain your safe space.
Phase 2 Alerts
- The soar phase of the fight can be skipped provided that the raid team executes proper openers and has sufficient DPS.
- Soar's orientation is determined by the direction Zurvan is facing - the images assume you are tanking him facing the North.
- Safe zones for each player should be determined before the raid begins.
Attack Script
- Soar & Flaming Halberd
- Demonic Dive
expand_more
Soar & Flaming Halberd
Soar & Flaming Halberd
Combo
Soar
Everyone Column AoE Divebomb- This attack combines a linear AoE (indicated by the orange rectangles) and a divebomb that sweeps across the length of the arena (indicated by the red arrows).
- Zurvan will begin by telegraphing 1 of 2 patterns (see images) that will tell players how they should arrange themselves - please note the images below assume you are tanking Zurvan in the North.
- The boss will split into 3 and follow the orange AoE telegraphs. He will then divebomb back through the original telegraphs, following through across the entire arena.
Flaming Halberd
Everyone Marker- All players but the healers will be marked (red circles) for this attack and it is crucial that they do not overlap - this is difficult as there are few safe areas during Soar.
- Players (blue dots) should arrange themselves according to the pattern Zurvan attacks with (see images for player locations).
- Healers can safely stack with another player.


expand_more
Demonic Dive
Demonic Dive
Everyone
Stack
Marker
Important Notes:
- This attack will place a stack marker on a healer and a red marker on another player.
- All players except the one marked with the red marker should stack, while the marked player flees.
Phase 3 Alerts
- An ice pad appears under the boss preventing you from passing through him.
- This phase includes a number of AoEs - pay attention to the boss' cast bar.
- After Biting Halberd, ensure the group stays stacked so that the ice puddle AoEs drop in the same location and then move quickly to avoid damage.
Attack Script
- Biting Halberd
- Southern Cross
- Ciclicle
- Tail End
expand_more
Biting Halberd
Biting Halberd
Everyone
Cone AoE
Important Notes:
- Zurvan will face a random direction and begin this massive cone AoE.
- The only safe spot is DIRECTLY BEHIND him.
expand_more
Southern Cross
Southern Cross
Everyone
AoE Puddle
Important Notes:
- Places an ice AoE puddle on all players - stack together to drop the AoEs in the same location and then move out to one side to avoid being hit.
- The main tank should move to the OPPOSITE side of the raid.
expand_more
Ciclicle
Ciclicle
Everyone
Donut AoE
Important Notes:
- Large donut AoE - the only safe space is within melee range of the boss.
expand_more
Tail End
Tail End
Everyone
Circular AoE
Important Notes:
- Large circular AoE - the only safe space is at the edge of the arena - don't forget to avoid the fire at the edge!
Phase 4 Alerts
- This phase contains 3 waves of adds.
- Wits are the most important to destroy as they will cast meteor.
- Wiles will cast a gaze that afflicts you with fear - face away.
Wave 01
- Expect 4 'Thews' and 1 'Will' to spawn in the north.
- The tank should grab these and everyone should DPS them down - beware 'Wills' as they do heavy tank damage.
Wave 02
- Expect 2 'Wills' in the west, 1 'Wile' in the south, and 1 'Wit' in the east.
Wave 03
- Expect 1 'Will' in the south, 1 'Wile' in the north, 1 'Wit' in the west, and 3 'Thews' in the east.
Attack Script
- Wave 01
- Wave 02
- Wave 03
Phase 5 Alerts
- Organization and communication is key in this phase - tethered players must stick together.
- Designate a side for players targeted with a blue marker - everyone else avoid them.
- The pattern of meteors during Broken Seal will determine the follow up AoE attack.
- Soar's orientation is determined by the direction Zurvan is facing - the images assume you are tanking him facing the North.
- Soar safe zones for each player should be determined before the raid begins.
Attack Script
- [Infinite Fire/Ice
- Wave Cannon
- Tyrfing
- Southern Cross
- Broken Seal
- Broken Seal - Follow Up]
- Repeat
- Soar & Flaming Halberd
- Demonic Dive
- The Demon's Claw & Wave Cannon
expand_more
Infinite Fire/Ice
Infinite Fire/Ice
Everyone
Tether
Important Notes:
- Players will be tethered with either a red or blue tether representing fire or ice respectively.
- Tethered players should never move farther apart than the width of the boss' hitbox - you will suffer massive DoT damage otherwise.
expand_more
Wave Cannon
Wave Cannon
Everyone
Marker
Column AoE
Important Notes:
- Player will be marked with a blue marker - they should move to a designated side of the arena.
- This long column AoE will cause bleed to other players around it.
expand_more
Tyrfing
Tyrfing
Tank
Healer
Tankbuster
Important Notes:
- The tank will be hit 5 times and then hit with Fire III - cooldown and heal as necessary.
expand_more
Broken Seal
Broken Seal
Everyone
Mechanic
Important Notes:
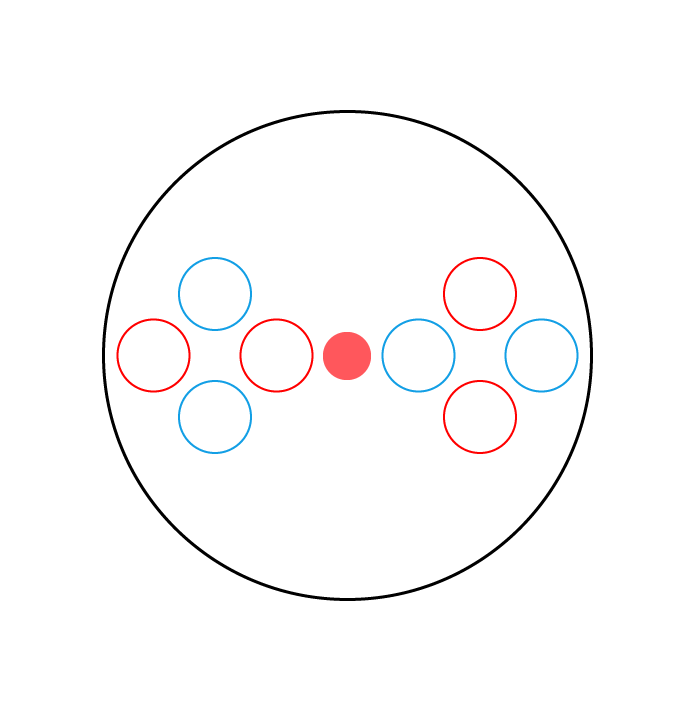
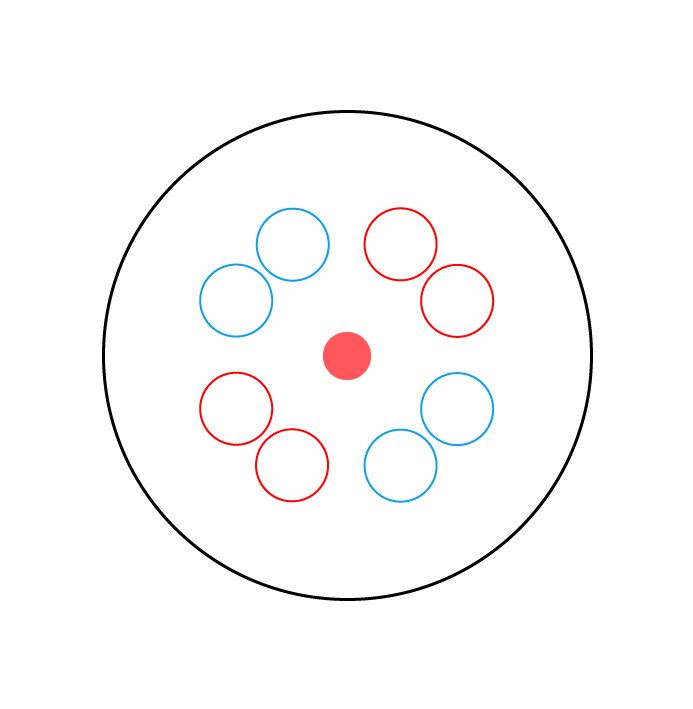
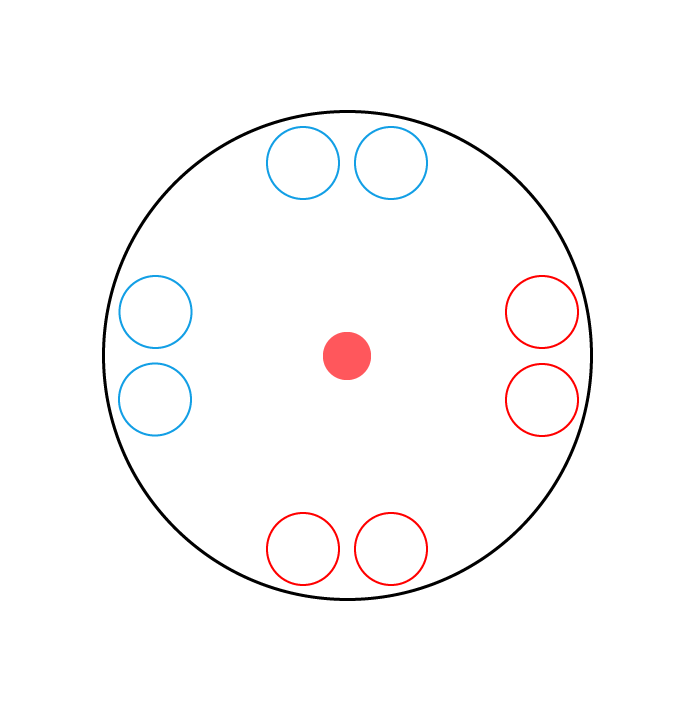
- Spawns red and blue meteors in 1 of 3 patterns (see images).
- Players tethered with fire should stand in the red, ice in the blue - be sure to stay near your tether partner!
- The pattern that occurs decides the next AoE attack (see follow up).
expand_more
Broken Seal - Follow Up
Broken Seal - Follow Up
Combo
(Side Clusters) Biting Halberd
Everyone Cone AoE- Zurvan will face a random direction and begin this massive cone AoE.
- The only safe spot is DIRECTLY BEHIND him.
(Inner Circle) Tail End
Everyone Circular AoE- Large circular AoE - the only safe space is at the edge of the arena - don't forget to avoid the fire at the edge!
(Outer Circle) Ciclicle
Everyone Donut AoE- Large circular AoE - the only safe space is within melee range of the boss.
expand_more
The Demon's Claw & Wave Cannon
The Demon's Claw & Wave Cannon
Combo
The Demon's Claw
Tank Healer Tankbuster- This attack targets the main tank with high damage, a magic damage up debuff, knockback, and stun.
- It is important for the tank to avoid being knocked off the edge - flip the boss around to be knocked back into the middle of the arena.
Wave Cannon
Everyone Column AoE- This attack will be telegraphed with a blue column and focus on the main tank.
- Players can either stack in front of the tank to soak the damage or the tanks can use Hallowed Ground/Living Dead.